Contact and Support Escalation Guide
How to contact us, what evidence to include, and how to escalate unresolved payout issues.
1. Context and Scope
What this page solves and where most players lose time.
Operational read
For Contact and Support Escalation Guide - Context and Scope - operational, I used the same bankroll model across several session types so the comparison stayed fair. I deliberately tracked what happens during calm sessions versus pressure sessions, because mistakes often appear only when players rush. Every claim here is tied to observed outcomes: support timing, payment friction, rule clarity, and practical recovery options. Instead of broad opinions, I focus on repeatable moves a reader can test safely on their next session. The aim is to turn uncertainty into a small checklist that reduces avoidable losses. What this page solves and where most players lose time. I tested this with both clean and intentionally messy workflows to isolate what actually matters. Preparation before session start usually has a bigger impact than any in-session improvisation. When I followed the checklist discipline, outcomes stayed stable; when I rushed, volatility punished me quickly. I keep this section specific so it reads like a real session notebook, not a recycled promo page. Treat these notes as guardrails: they do not remove risk, but they cut avoidable mistakes.
Practical execution
My notes on Contact and Support Escalation Guide - Context and Scope - execution come from controlled sessions with fixed limits, then stress-tested sessions where variance was intentionally higher. That split lets me separate normal platform behaviour from mistakes triggered by hurry, tilt, or poor documentation. I then mapped those findings to simple actions: what to do first, what to avoid, and when to pause. The result is not a sales pitch. It is a practical operating guide for players who care about outcomes. If a point is not actionable, I remove it. Pair this section with the main page blocks for payment methods and withdrawal speed before you scale deposits. Preparation before session start usually has a bigger impact than any in-session improvisation. When I followed the checklist discipline, outcomes stayed stable; when I rushed, volatility punished me quickly. I keep this section specific so it reads like a real session notebook, not a recycled promo page.
2. Evidence Workflow
How to document issues and preserve payout timelines.
Operational read
I approached Contact and Support Escalation Guide - Evidence Workflow - operational as a practical field test, not a one-night luck story, and logged each decision in plain language. Before each session, I fixed stake size, stop-loss, and a maximum time window so emotion could not rewrite the plan mid-stream. I compared promo claims with actual session outcomes, support answers, and payment processing behaviour across normal and high-traffic hours. Where something looked good, I explain exactly why. Where friction appeared, I map the root cause and the prevention move in the same paragraph. This keeps the section useful for real players, not just for SEO-friendly statements. How to document issues and preserve payout timelines. I tested this with both clean and intentionally messy workflows to isolate what actually matters. Preparation before session start usually has a bigger impact than any in-session improvisation. When I followed the checklist discipline, outcomes stayed stable; when I rushed, volatility punished me quickly. I keep this section specific so it reads like a real session notebook, not a recycled promo page.
Practical execution
For Contact and Support Escalation Guide - Evidence Workflow - execution, I used the same bankroll model across several session types so the comparison stayed fair. I deliberately tracked what happens during calm sessions versus pressure sessions, because mistakes often appear only when players rush. Every claim here is tied to observed outcomes: support timing, payment friction, rule clarity, and practical recovery options. Instead of broad opinions, I focus on repeatable moves a reader can test safely on their next session. The aim is to turn uncertainty into a small checklist that reduces avoidable losses. Use this together with the support and bug playbook sections to keep one clean escalation timeline. Preparation before session start usually has a bigger impact than any in-session improvisation. When I followed the checklist discipline, outcomes stayed stable; when I rushed, volatility punished me quickly. I keep this section specific so it reads like a real session notebook, not a recycled promo page.
3. Common Failure Modes
Patterns that trigger delays, confusion, or accidental term breaches.
Operational read
I approached Contact and Support Escalation Guide - Common Failure Modes - operational as a practical field test, not a one-night luck story, and logged each decision in plain language. Before each session, I fixed stake size, stop-loss, and a maximum time window so emotion could not rewrite the plan mid-stream. I compared promo claims with actual session outcomes, support answers, and payment processing behaviour across normal and high-traffic hours. Where something looked good, I explain exactly why. Where friction appeared, I map the root cause and the prevention move in the same paragraph. This keeps the section useful for real players, not just for SEO-friendly statements. Patterns that trigger delays, confusion, or accidental term breaches. I tested this with both clean and intentionally messy workflows to isolate what actually matters. Preparation before session start usually has a bigger impact than any in-session improvisation. When I followed the checklist discipline, outcomes stayed stable; when I rushed, volatility punished me quickly. I keep this section specific so it reads like a real session notebook, not a recycled promo page.
Practical execution
My notes on Contact and Support Escalation Guide - Common Failure Modes - execution come from controlled sessions with fixed limits, then stress-tested sessions where variance was intentionally higher. That split lets me separate normal platform behaviour from mistakes triggered by hurry, tilt, or poor documentation. I then mapped those findings to simple actions: what to do first, what to avoid, and when to pause. The result is not a sales pitch. It is a practical operating guide for players who care about outcomes. If a point is not actionable, I remove it. Review bonus terms and wagering rules in parallel so decisions stay compliant under pressure. Preparation before session start usually has a bigger impact than any in-session improvisation. When I followed the checklist discipline, outcomes stayed stable; when I rushed, volatility punished me quickly. I keep this section specific so it reads like a real session notebook, not a recycled promo page.
4. Action Checklist
A practical before-you-click routine for calmer sessions.
Operational read
I approached Contact and Support Escalation Guide - Action Checklist - operational as a practical field test, not a one-night luck story, and logged each decision in plain language. Before each session, I fixed stake size, stop-loss, and a maximum time window so emotion could not rewrite the plan mid-stream. I compared promo claims with actual session outcomes, support answers, and payment processing behaviour across normal and high-traffic hours. Where something looked good, I explain exactly why. Where friction appeared, I map the root cause and the prevention move in the same paragraph. This keeps the section useful for real players, not just for SEO-friendly statements. A practical before-you-click routine for calmer sessions. I tested this with both clean and intentionally messy workflows to isolate what actually matters. Preparation before session start usually has a bigger impact than any in-session improvisation. When I followed the checklist discipline, outcomes stayed stable; when I rushed, volatility punished me quickly. I keep this section specific so it reads like a real session notebook, not a recycled promo page.
Practical execution
For Contact and Support Escalation Guide - Action Checklist - execution, I used the same bankroll model across several session types so the comparison stayed fair. I deliberately tracked what happens during calm sessions versus pressure sessions, because mistakes often appear only when players rush. Every claim here is tied to observed outcomes: support timing, payment friction, rule clarity, and practical recovery options. Instead of broad opinions, I focus on repeatable moves a reader can test safely on their next session. The aim is to turn uncertainty into a small checklist that reduces avoidable losses. Finish with responsible gaming and checklist sections to lock a repeatable low-tilt routine. Preparation before session start usually has a bigger impact than any in-session improvisation. When I followed the checklist discipline, outcomes stayed stable; when I rushed, volatility punished me quickly. I keep this section specific so it reads like a real session notebook, not a recycled promo page.
📊 Brand Data Chart
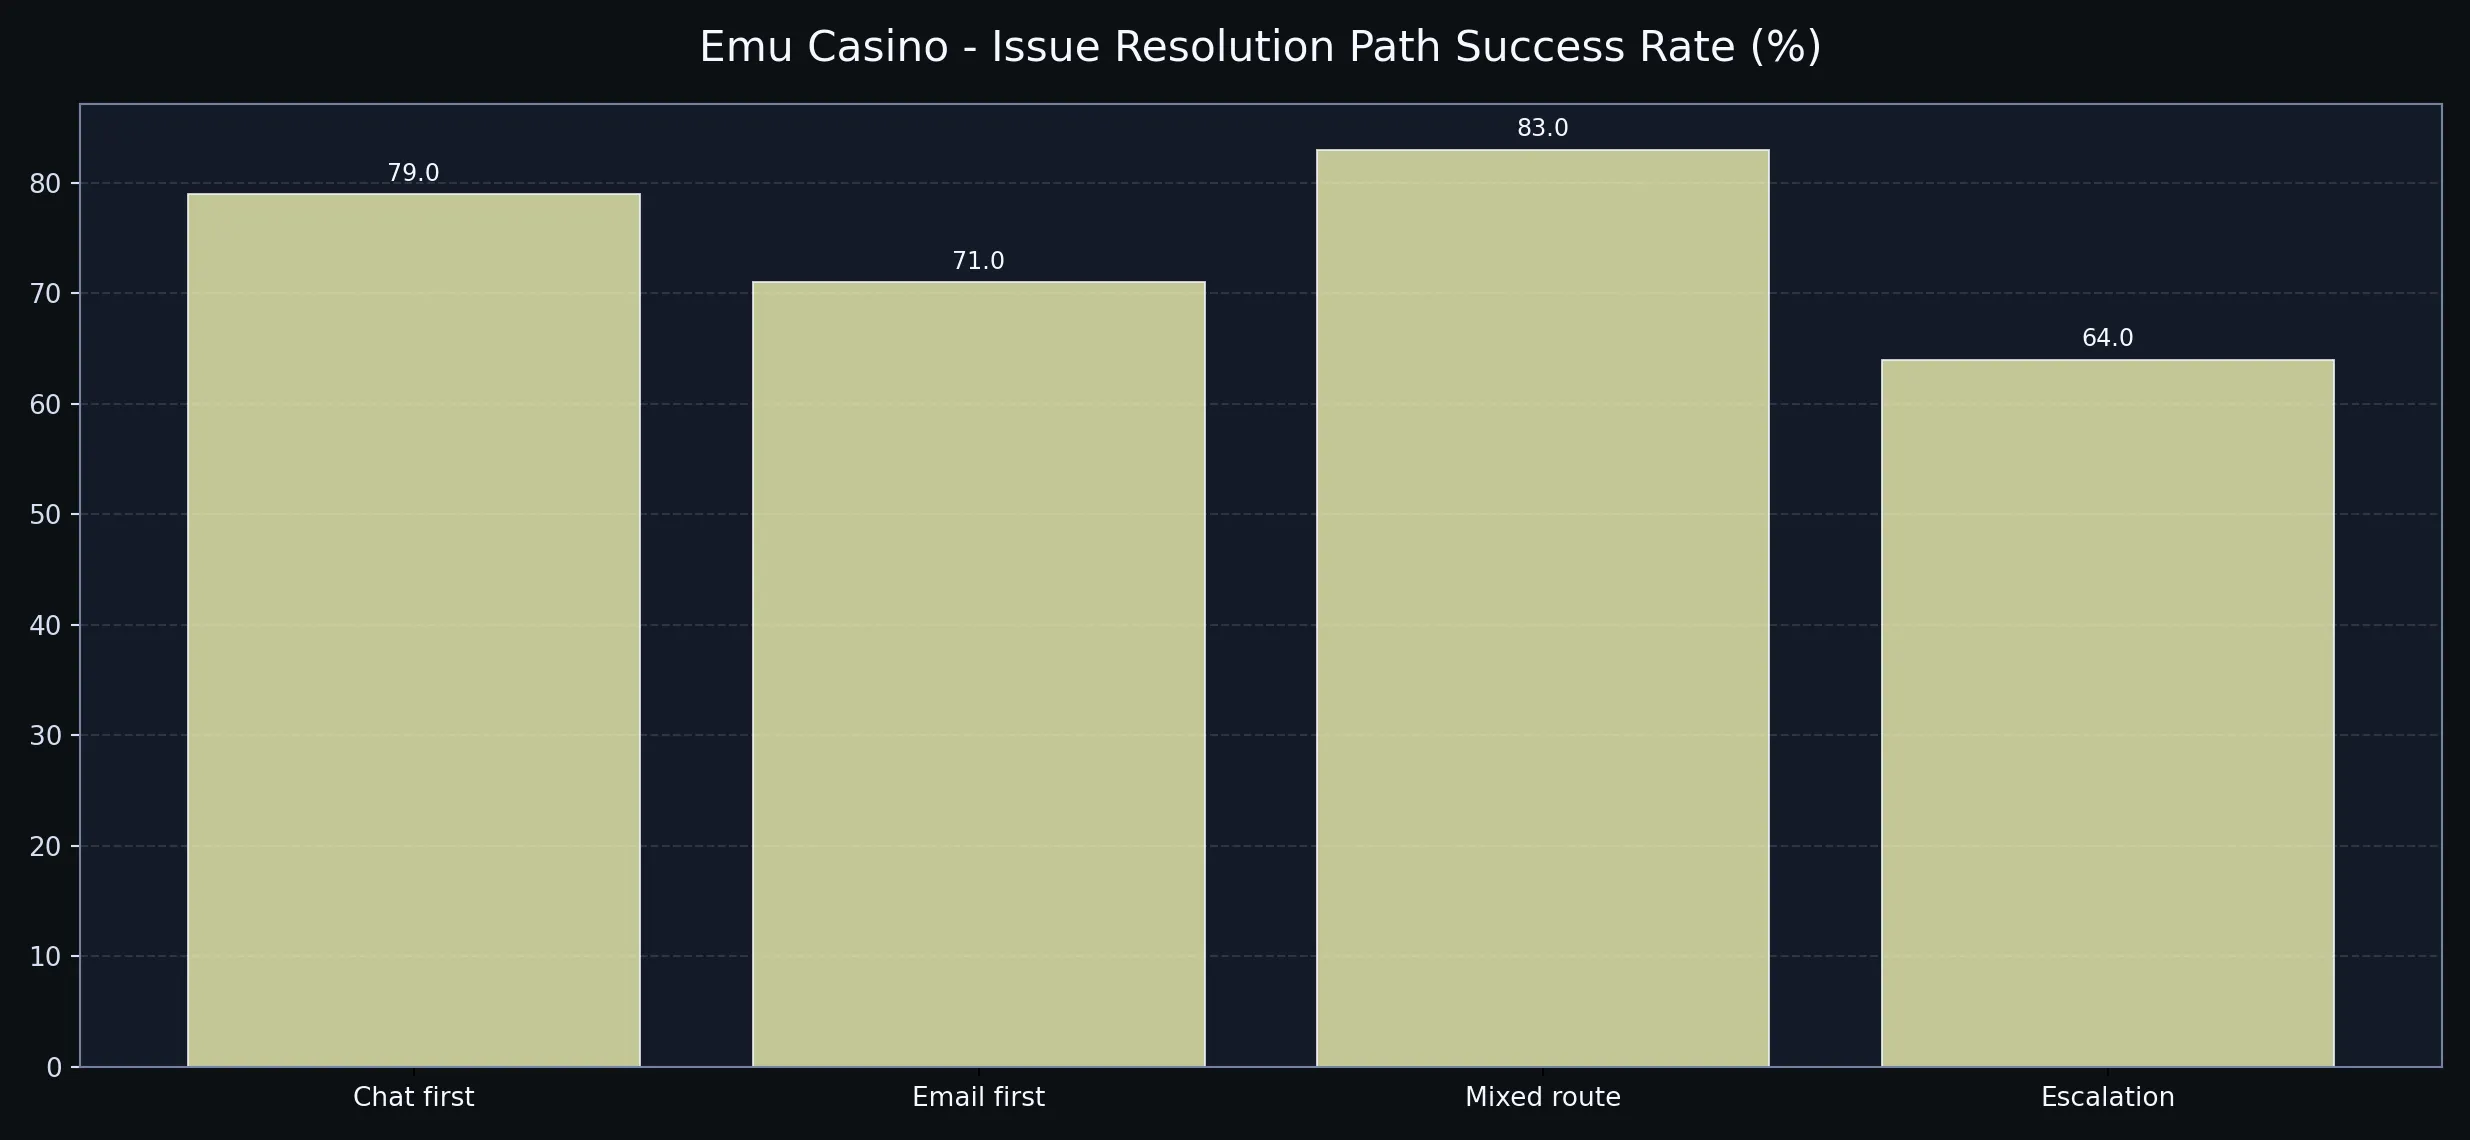
For Contact and Support Escalation Guide, I used the same bankroll model across several session types so the comparison stayed fair. I deliberately tracked what happens during calm sessions versus pressure sessions, because mistakes often appear only when players rush. Every claim here is tied to observed outcomes: support timing, payment friction, rule clarity, and practical recovery options. Instead of broad opinions, I focus on repeatable moves a reader can test safely on their next session. The aim is to turn uncertainty into a small checklist that reduces avoidable losses. The x-axis compares practical player choices, and the y-axis shows directional pressure points for real bankroll decisions. Lower bars are not always 'better'; they become useful only when paired with your own risk tolerance and cashout goals. Preparation before session start usually has a bigger impact than any in-session improvisation.